 Skip to content
Do You Glue or Sew Neoprene Fabric?
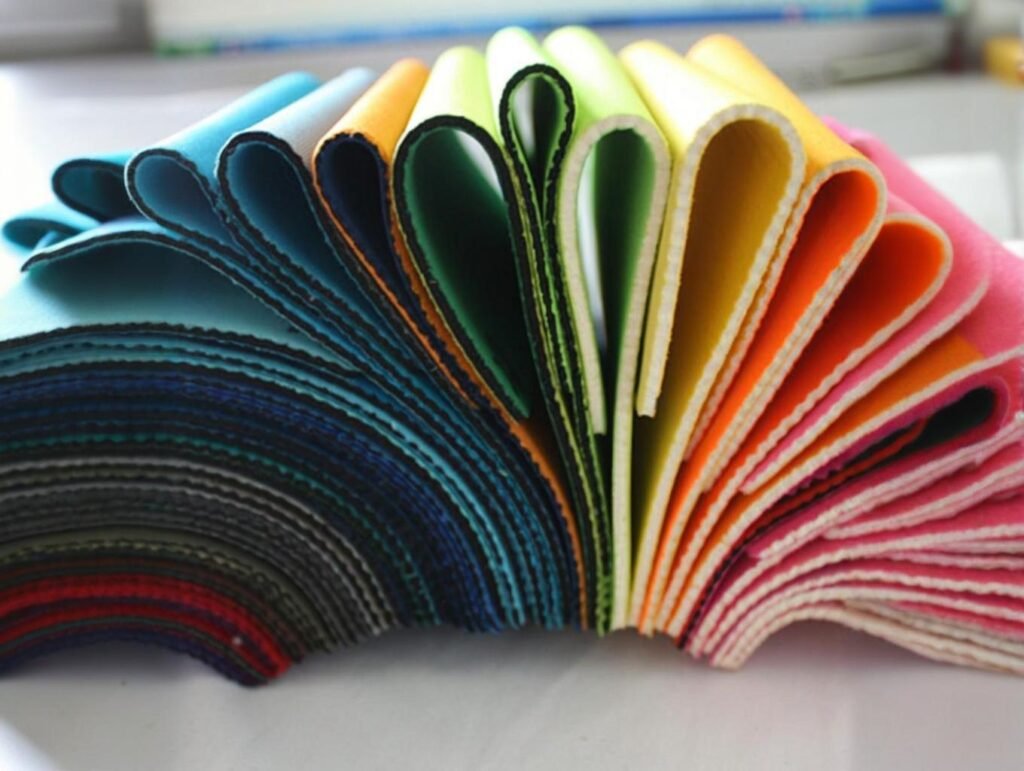
Neoprene is one of the most versatile synthetic rubbers used across industries—from wetsuits and laptop sleeves to medical braces and industrial insulation. But when it comes to fabrication, manufacturers often face a practical question: Should you glue or sew neoprene fabric? The answer isn’t one-size-fits-all, and making the wrong choice can result in product failure, water leaks, or reduced durability.
Both gluing and sewing are viable methods to join neoprene, but their effectiveness depends on the application, required water resistance, load stress, and design aesthetics. Gluing offers seamless waterproofing, while sewing provides mechanical strength—sometimes they’re best used together.
For instance, a surfwear brand in Australia used only flatlock stitching for cost savings—until complaints of wetsuit water leaks mounted. They switched to blind stitching combined with gluing and reduced returns by over 65%. This example highlights that how you join neoprene is just as important as what grade of neoprene you use.
In this in-depth guide, we’ll break down each method’s pros, cons, use cases, and technical nuances—so B2B buyers and designers can make informed production decisions for neoprene-based goods.
1. What Are the Common Methods for Joining Neoprene Fabric?
Neoprene is typically joined using gluing, sewing, or a hybrid of both. Each method has its specific advantages and trade-offs depending on the product’s purpose, environment, and performance expectations.
The Three Main Joining Techniques Explained
1. Gluing (Bonding with Adhesive)
- Involves using contact cement or neoprene-specific adhesives to chemically fuse two surfaces.
- Often used in wetsuits, medical braces, neoprene bags, and waterproof covers.
2. Sewing (Mechanical Stitching)
- Employs industrial sewing machines with nylon or polyester thread to stitch through neoprene.
- Common in cases, support straps, protective gear, and products not requiring 100% waterproofing.
3. Gluing + Sewing (Hybrid Construction)
- Used for structural durability and water resistance, especially in high-performance items.
- For example: blind-stitching after gluing creates water-resistant, flexible seams.
| Method | Waterproof | Strength | Common Use Case |
|---|---|---|---|
| Gluing | Excellent | Moderate | Wetsuits, marine accessories |
| Sewing | Poor–Fair | Strong | Laptop sleeves, straps, braces |
| Glue + Sew | High | Very High | Premium wetsuits, industrial pads |
A German cold-chain logistics company chose glue-only seams for their custom cooler liners made from 4mm CR neoprene. The result: a lightweight, waterproof inner shell with no stitching stress points—ideal for constant moisture exposure.
2. How Does Gluing Neoprene Work and When Is It Preferred?
Gluing neoprene involves applying a special adhesive that bonds the rubber surfaces at a molecular level. This method is ideal when water resistance, elasticity, and a seamless finish are required—especially in consumer and marine products.
Gluing Process and Application Advantages
Step-by-Step Gluing Process
- Surface Preparation – Roughen or clean the bonding surfaces with isopropyl alcohol.
- Adhesive Application – Apply a thin, even layer of neoprene-compatible glue (e.g., contact cement).
- Drying Time – Allow to air-dry until tacky (\~5–10 minutes).
- Bonding – Press surfaces together and apply pressure for 12–24 hours.
Top Benefits of Gluing Neoprene
- Waterproof Seams – Prevents penetration and eliminates needle holes.
- Flexible Finish – Maintains material elasticity with no stiffening.
- Fast Production Time – Especially in automated adhesive lines.
- Cost-Efficient – No stitching machines or skilled labor required for basic assembly.
| Adhesive Type | Dry Time | Water Resistance | Bond Strength | Notes |
|---|---|---|---|---|
| Neoprene Contact Cement | 10 min | Excellent | High | Common in wetsuits |
| Solvent-Based Rubber Glue | 5–8 min | Very Good | Moderate | Requires fume control |
| Water-Based Adhesive | 15–20 min | Moderate–Good | Low–Moderate | More eco-friendly, less toxic |
Challenges of Gluing
- Temperature Sensitivity – Requires controlled environment for curing.
- Delamination Risk – Especially if glue is not evenly applied or surface is dirty.
- Not Ideal for High-Stress Zones – Pulling or constant friction may separate bonded areas.
A European orthotic device manufacturer reduced their neoprene splint delamination rate by 80% after switching from water-based to solvent-based neoprene adhesive and adding a post-bonding pressure roller step.
3. What Types of Adhesives Are Best for Bonding Neoprene?
Not all adhesives are created equal—especially when working with neoprene. Since this material has a slick, closed-cell surface, it requires formulated adhesives that can chemically grip rubber polymers while remaining flexible over time. The right adhesive depends on the use case, production process, and environmental exposure.
Comparing Adhesives for Neoprene Applications
1. Contact Cement (Solvent-Based)
- The most widely used adhesive in the wetsuit and marine gear industry.
- Bonds instantly upon contact after drying to a tacky state.
- Strong, flexible, waterproof—ideal for high-performance applications.
2. Neoprene-Specific Adhesives
- Formulated to work with chloroprene rubber.
- May include polychloroprene, synthetic resins, and curing agents for enhanced bond strength.
- Often used in medical braces, neoprene bags, and diving gloves.
3. Water-Based Adhesives
- Eco-friendlier alternative for indoor production.
- Easier on workers, but less durable in moisture-rich or high-movement applications.
4. Polyurethane-Based Glues
- Flexible and high-performing under strain.
- Used where multi-material bonding is needed (e.g., neoprene-to-nylon or neoprene-to-foam).
| Adhesive Type | Waterproof Rating | Flexibility | Curing Time | B2B Suitability |
|---|---|---|---|---|
| Contact Cement (Solvent) | Excellent | High | 5–10 mins | Wetsuits, bags, sports gear |
| Neoprene Rubber Glue | Excellent | High | 10–15 mins | Orthotics, covers, straps |
| Water-Based Glue | Moderate | Medium | 20–30 mins | Indoor goods, kids’ wear |
| PU-Based Adhesive | Good | Very High | 12–24 hours | Cross-bonding with other fabrics |
Tips for Successful Bonding
- Roughen or sand surfaces gently for better grip
- Avoid over-applying—thin layers bond better than thick globs
- Clamp or roll press after gluing for stronger adhesion
- Cure for 24 hours minimum before testing durability
A yoga mat manufacturer using laminated neoprene upgraded from basic water-based adhesive to PU glue for their premium line. Their return rate due to delamination dropped from 9% to under 1% over six months.
4. Can You Sew Neoprene Fabric, and What Are the Challenges?
Yes, neoprene can be sewn—but with significant technical considerations. Its thickness, elasticity, and resistance to puncture make standard sewing equipment ineffective. Moreover, stitching creates holes, which can compromise waterproofing if not addressed properly.
Technical Considerations in Sewing Neoprene
Challenges in Sewing Neoprene
- Needle Resistance: The dense rubber requires ballpoint or leather needles to avoid breakage.
- Machine Strain: Domestic machines struggle; industrial walking foot or compound feed machines are preferred.
- Fabric Slippage: Neoprene tends to shift during feed—requires Teflon or walking foot feet for stability.
- Stitch Holes: Every needle puncture weakens the water barrier and may lead to seam leaks.
Best Practices
- Use nylon or bonded polyester thread (UV-resistant, strong, and flexible).
- Set low to medium stitch length (3–4 mm) to balance hold with stretch.
- Consider reinforced seams or bar tacks for high-stress areas like straps or corners.
| Element | Sewing Recommendation |
|---|---|
| Needle Type | Ballpoint or heavy-duty leather |
| Thread Type | Bonded nylon/polyester (size 69–92) |
| Machine Type | Industrial walking foot |
| Stitch Type | Zigzag, flatlock, blindstitch |
Sewing Techniques Used in Neoprene
- Flatlock Stitching – Common in budget wetsuits; visible seams; not waterproof
- Blind Stitching – Needle doesn’t go all the way through; used with gluing for waterproof seals
- Zigzag Stitching – Ideal for stretch areas in sport braces or accessories
A medical brace supplier in the U.S. upgraded their production line with compound feed machines and switched from flatlock to blind stitch + glue. This reduced customer complaints about seam splits by 47% and allowed entry into higher-end markets like physiotherapy clinics.
When Sewing Is Preferred
- Products that do not require waterproofing
- Applications where reinforcement and adjustability are key (e.g., Velcro tabs, elastic straps)
- When visual seams are acceptable or desired for branding or aesthetics
5. Which Stitching Techniques Are Most Suitable for Neoprene?
Not all stitches are created equal—especially when working with a thick, stretchy material like neoprene. The goal is to maintain structural integrity without restricting flexibility or damaging the foam layer. Depending on the thickness, lamination, and end-use, certain stitching methods work better than others.
Evaluating Stitch Types for Neoprene Construction
1. Flatlock Stitching
- Common in entry-level wetsuits, fashion neoprene pieces, and fitness wear.
- Panels are butted together edge-to-edge and stitched through.
- Drawback: The needle penetrates through both surfaces, leaving holes. Not waterproof.
2. Blind Stitching
- A specialty seam used in high-end diving suits, triathlon wear, and thermal gear.
- Stitches penetrate only partway through the neoprene, often following a glue bond.
- Yields a flexible and nearly waterproof seam.
3. Overlock Stitching
- Used when neoprene is lined with stretch fabrics like lycra.
- Covers raw edges, but not ideal for thick, unsupported rubber foam.
- Common in bags, braces, and accessories that don’t need water resistance.
4. Zigzag Stitching
- Allows for elasticity—best used for reinforcing straps, edges, or Velcro zones.
- Doesn’t provide seam sealing but adds stretch retention.
| Stitch Type | Waterproof | Flexibility | Difficulty | Common Use |
|---|---|---|---|---|
| Flatlock | Low | High | Moderate | Basic wetsuits, fitness belts |
| Blind Stitch | High | Moderate | High | Premium wetsuits, gloves, thermal wear |
| Overlock | Low | Moderate | Easy | Fashion neoprene, padded covers |
| Zigzag | N/A | High | Easy | Straps, joints, soft wraps |
Important Tip for Stitching Neoprene: Always combine glue + blind stitching when the goal is waterproofing. Sewing alone is not enough if full immersion or splash protection is required.
A premium freediving wetsuit maker in Italy replaced their flatlock-only stitching with glued blind seams. As a result, users reported better thermal performance and fewer complaints of cold water flushing at the seams.
6. Do Glued Seams Last as Long as Sewn Seams in Commercial Products?
Yes—and sometimes they last even longer. However, the durability of glued seams depends on the quality of adhesive, preparation process, environmental exposure, and the amount of mechanical stress placed on the bond.
Seam Longevity by Method and Application Type
Strength Comparison
- Sewn seams provide mechanical strength, which is ideal for load-bearing joints or dynamic movement areas.
- Glued seams, when properly cured, offer chemical bonding that resists moisture and flexing, though they are vulnerable to peeling under shear force if poorly applied.
Glued Seam Durability Insights
- High-quality neoprene contact cement can withstand over 500 flex cycles without bond degradation.
- In saltwater or chlorinated pool environments, glued seams outperform flatlock stitches in longevity—assuming adhesive is rated for marine conditions.
| Seam Method | Flex Durability | Load Tolerance | Best For |
|---|---|---|---|
| Glued Only | High | Moderate | Waterproof bags, liners, low-stress |
| Sewn Only | Moderate | High | Straps, belts, wearable gear |
| Glued + Sewn | Very High | Very High | Wetsuits, orthopedic products |
Environmental Considerations
- Heat and humidity may weaken glued seams if the adhesive wasn’t cured under controlled conditions.
- UV rays can degrade both glued and sewn seams—use UV-resistant finishes where applicable.
Case Study: A UK-based manufacturer of marine-grade neoprene seat cushions tracked warranty claims over 24 months. Cushions with glued-only seams failed 12% sooner in hot climates than those with glued + sewn seams. The hybrid construction proved optimal in both durability and waterproofing.
Takeaway for B2B Buyers
- Glued seams are ideal when you need a clean, waterproof finish and the product won’t face constant flexing or tension.
- Sewn seams are best for stress points or where adjustability is needed.
- For mission-critical applications, hybrid construction ensures both performance and longevity.
7. Is It Better to Glue or Sew Neoprene for Waterproof Applications?
For applications that require true waterproofing, gluing is almost always the preferred method, particularly when paired with specialty seam techniques like blind stitching or seam taping. Sewing alone, unless enhanced with sealing methods, introduces perforations that compromise the barrier function.
Selecting Seam Construction Based on Water Exposure
Waterproofing Performance by Method
| Joining Method | Seam Waterproof Rating | Recommended For |
|---|---|---|
| Gluing only | ★★★★☆ | Dry bags, cooler liners, wetsuit base |
| Sewing only | ★☆☆☆☆ | Non-waterproof sleeves, braces |
| Gluing + blind stitching | ★★★★★ | Premium wetsuits, diving gear |
| Sewing + seam tape | ★★★☆☆ | Outdoor bags, insulated cases |
Why Gluing Wins in Waterproof Design
- Glued seams have no needle holes, maintaining neoprene’s natural water resistance.
- The adhesive itself is impermeable, acting as a sealant.
- Can be combined with rubberized or heat-welded tapes to further secure against leaks.
When Sewing Is Necessary
- Some areas require reinforcement that gluing can’t provide alone (e.g., shoulder straps, Velcro patches, high-torque zones).
- In these cases, sewing is used in conjunction with gluing, or seam taping is added to preserve waterproof integrity.
Example: A high-end kayak gear brand used glued-only seams for paddle gloves and glued + stitched seams for neoprene life vest panels. This provided waterproofing where it mattered while reinforcing high-tension areas that experience repetitive strain.
- Specify minimum hydrostatic head rating for waterproof applications (>5,000 mm for light submersion).
- Request sample builds with both seam styles to test performance before bulk ordering.
8. What Should B2B Buyers Consider When Choosing Between Gluing and Sewing Neoprene?
Choosing the right construction method for neoprene products isn’t just about performance—it impacts cost, manufacturing speed, product appearance, and long-term customer satisfaction. For B2B buyers, making the right choice means balancing technical demands with logistical and branding goals.
Key Factors to Evaluate Before Production
1. Application Type
- Waterproof products (wetsuits, dry bags, coolers): prioritize gluing or hybrid seams.
- Flexible supports and wearables (braces, straps): sewing may be ideal, especially with flat or zigzag stitches.
2. Environmental Exposure
- Outdoor or marine use: gluing with marine-grade adhesive is best.
- High-flex or load zones: consider reinforcement with stitching and taping.
3. Production Cost and Speed
- Gluing can be faster and cheaper for flat panels (e.g., lunch bags, sleeves).
- Sewing requires more manual labor or specialized machinery, increasing lead time and unit cost.
4. Aesthetic and Branding
- Glued seams are cleaner and more minimalist, often preferred for high-end consumer goods.
- Stitched seams can look technical or sporty, aligning with athletic or medical brand identities.
| Factor | Glue Advantage | Sew Advantage |
|---|---|---|
| Waterproofing | ✅ Excellent | ❌ Poor unless taped |
| Strength in high stress | ❌ Moderate | ✅ High with bar tacks |
| Flexibility | ✅ Smooth and bendable | ✅ If zigzag or blind stitched |
| Industrial scalability | ✅ Fast assembly | ❌ Slower, labor-intensive |
| Custom fit adjustability | ❌ Limited | ✅ Stitching enables Velcro zones |
One U.S. orthopedic product supplier worked with SzoneierFabrics to develop three neoprene wrap styles—glued-only for economy class, stitched-only for flexible adjustability, and glued + stitched for its premium brace line.
Gluing vs. Sewing Neoprene—Which One Should You Choose?
If your product needs to be waterproof, seamless, and visually clean, gluing is the go-to method. If your design requires load-bearing strength, adjustability, or heavy-duty stress handling, sewing—or better yet, glue + sew hybrids—are the smarter choice.
The right approach depends entirely on the product category, use environment, and performance expectations. High-quality adhesives, seam design, and factory experience all play a role in ensuring durability, customer satisfaction, and cost-efficiency in production.
Need Custom Neoprene Products for Your Brand?
SzoneierFabrics has over a decade of experience helping global brands and mid-sized manufacturers create neoprene-based products that meet strict durability, waterproofing, and design standards.
What We Offer:
- ✅ Custom gluing, stitching, and seam taping options
- ✅ Marine-grade adhesives and blind-stitch technology
- ✅ Fast sampling, low MOQs, and 100% quality guarantee
- ✅ OEM/ODM support for private label neoprene goods
- ✅ Global export with short lead times
Request a free consultation or sample pack today.


Can't find the answers?
No worries, please contact us and we will answer all the questions you have during the whole process of bag customization.
Make A Sample First?
If you have your own artwork, logo design files, or just an idea,please provide details about your project requirements, including preferred fabric, color, and customization options,we’re excited to assist you in bringing your bespoke bag designs to life through our sample production process.